Azuarc's Leveling Guide part 10
Azuarc's leveling guide for Alliance, Act 10: Stranglethorn Vale (levels 41-44)
We Just Couldn't Stay Away
We finally make our return to Stranglethorn. Your quest log will likely be empty with the exception of:
When you reach Booty Bay, you will also receive a few quests that are not for Stranglethorn.
Those last two should indicate where we will likely head next. But then you should also be picking up all your old quests again, as well as some new ones that have become available in the last 5 levels.
- "Pretty Boy" Duncan
- Scaring Shaky
- The Bloodsail Buccaneers
- Venture Company Mining
- Skullsplitter Tusks
- The Captain's Chest
- Akiris By the Bundle
- Zanzil's Secret
- Stranglethorn Fever
When you fly up to the two camps, which you will do to start scene 1, you will also find:
- Special Forces
- Troll Witchery
- Panther Mastery 3
- Raptor Mastery 3
- The Green Hills of Stranglethorn (and chapters)
And for a refresher, here's the map of Stranglethorn:
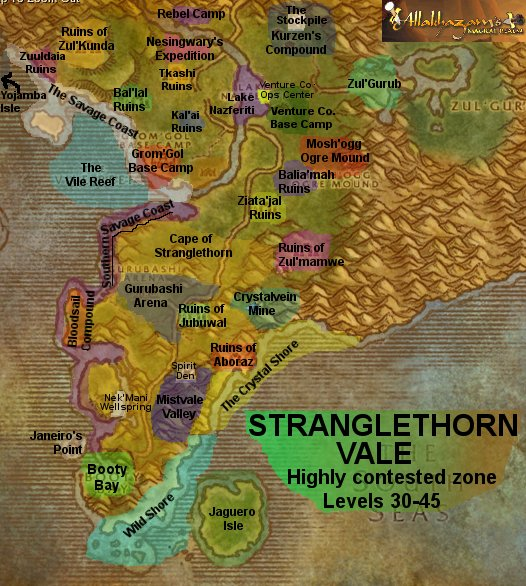
The Green Hills of Stranglethorn
Let's face it: this quest is annoying. You never get the drops you want. You run out of bag space. I suggested in act 7 that you put all your pages in the bank, and you should keep doing that. However, at some point you will want to start trading for your missing pages so you can finish it. If no sooner, you will want to look into that around scene 5 or 6, as you will be wrapping up the last of your humanoid killing then.
Or you could blow the quests off completely. Quite honestly, they aren't really worth it. It's free exp, sort of, but it's a nuisance. The clog it puts on your inventory is not worth the overall reward.
Scene 1: Dial Down the Center (level 41)
Quests completed: Special Forces, Panther Mastery 3, Troll Witchery, Skullsplitter Tusks, Raptor Mastery 3
Most of these quests we can pretty well take in any order since level 41 is plenty high to take a stab at just about anything in Stranglethorn. However, that's actually a problem for one quest. Special Forces has been green for a couple levels, and needs to be wrapped up before it turns gray. So your first order of business, after collecting all the quests, is to go to Kurzen's Compound and head for the cave in the back. The Stockpile is lined with Kurzen Commandoes who lurk in stealth, as well as the Headshrinkers you need for the quest. They continue until the tunnel turns a corner and goes down a steep descent. If you pass this point without finishing the quest, turn around and range from here to the entrance. Partner up with anyone else who needs it to get the quest done, but make it clear to them you aren't going on to Colonel Kurzen right after (although you certainly could and that's up to you.)
Rather, you should ride due south, past Zul'Gurub, to an area behind the Venture Co. Base Camp. (On the guide's map, this is just north of the G's in Mosh'ogg.) There are Stranglethorn Tigresses in the area, which serve no purpose for us except to get in our way, however there are also Shadowmaw Panthers lurking in stealth. Hunt around for them. Finish up Panther Mastery, and then go around the ogre mound to the south.The entire region south of the Mosh'ogg Ogre Mound and north of Crystalvein Mine on the east side of the road contains trolls. Trolls you need to take the tusks of. You'll be here for a little while, so learn the lay of the land, watch out for 3-man patrols, and look for Mystics when you can for Troll Witchery. Chances are you will get your 4 fetishes long before your 18 troll tusks.
One last task! After you finish culling the local troll population, go across the street and out west toward the shore. In the areas north of the arena, you should find Jungle Stalkers, which are the third class of raptors. Once you kill 10 of them, you can return to Booty Bay.
Scene 2 - Close to Home (level 41/42)
Quests completed: The Bloodsail Buccaneers 1, 2 and 3, "Pretty Boy" Duncan, Scaring Shaky
You can complete scenes 2 and 3 in either order. Both are moderately short, but this one is listed first in case you used your hearthstone at the end of Scene 1.
Walk outside Booty Bay. Once you are past the teeth, turn left. There is a narrow path to the side where you should see a few Bloodsail Mages. Move past them to a camp by the water's edge. Here you will find "Pretty Boy" Duncan, as well as the Bloodsail plans laying out on top of a crate.
After you realize both of these objectives, return to the road and travel north a short distance. Before long, you will see white gorillas off the right side of the road. Enter the Mistvale Valley and kill them until you have 5 giblets for Scaring Shaky.
Walk back to Booty Bay.
Scene 3 - The Colonel (level 41/42)
Quests completed: Panther Mastery 4, Colonel Kurzen
Scene 3 contains the follow-ups to the first two quests from scene 1, however for reasons that will become obvious, we're going to flip the order.
Remember where you killed the Shadowmaw Panthers for Panther Mastery 3? Well head over there again (from the two camps. You need to complete your old quests first.) Somewhere in the area should hopefully be Bhag'thera, the big head panthress. Bhag'thera does not use stealth, and is level 40. There is the slight possibility you might not be able to find her because she isn't there. That is the more common of two locations Bhag'thera can appear, but if she is simply not to be found, go around the ogres as though you were going back to the trolls again. In the area north of Balia'mah Ruins are more cats, and that is the other place she can spawn.
With Bhaggy's paw in hand, return to Kurzen's Stockpile and clear past the area you were in. Down the-slope-you-were-told-not-to-cross is where the good Colonel is hiding out. The first chamber is large and open, and contains Witch Doctors and Elites. Stay here until you have all 6 elites unless you want to be like, er, a friend of mine and think you are done after you kill Kurzen and leave prematurely. There's also another quest here for the Bookie Herod line if you happened to start that, which isn't likely since the quest starter happens about once per half hour, so forget I said anything.
The next chamber, which is harder to navigate, has Subchiefs in it and the odd Shadow Hunter. There is a small tunnel at the other side of it that leads to Colonel Kurzen's room. This was once a challenging fight that took a group. Now you just need to fully clear around him before fighting him and the guy closest to him. When you are finished, you *could* fight back out, but it's easier to just hearth. Make sure you finished the whole quest!
Scene 4 - Mid-Zone Clearance (level 42)
Quests completed: Venture Company Mining, Voodoo Dues, Zanzil's Secret
Follow the road past the arena. On the right side of the road, south of the trolls, is a Venture Co. strip mine. Some of the mobs in this area are very annoying, so don't make any risky pulls. Fight until you have the crystals you need, and then head back toward the arena.
Across from the arena itself is the Ruins of Jubuwal. You have two orders of business here, but the one that will take longer is Zanzil's Secret. Zanzil's Mixture is not as common as it should be for needing 14 of them, so kill everything here, and make sure you get Maury and Jon-Jon while you're here for Voodoo Dues.
After you've swept the place clean, you might be wondering, "Wait. Where's Chucky?" He's somewhere else altogether: The Ruins of Aboraz. If you leave Jubuwal and follow the road south just a little bit, you'll see an archway extending over a small path on the east side of the road. (This is before the Crystalvein Mine.) Follow the path out to the beach and you will find the other place where Zanzil stuff is. Hang out here and finish Zanzil's Secret as well as locate Chucky near the back-left part of the ruins. Do not approach the "main room" of the ruins where Zanzil himself is. He's bad mojo.
Back to Booty Bay, preferably on foot. Wait a moment when you turn in Voodoo Dues for a follow-up.
Scene 5 - Corn For a Dollar (level 43)
Quests completed: The Bloodsail Buccaneers 4, Up To Snuff (maybe), Keep an Eye Out (maybe), The Captain's Chest (maybe)
When you finished The Bloodsail Buccaneers, two other quests became available, Up to Snuff and Keep an Eye Out. Make sure you have both these quests.
Leave town and immediately turn right. Go off the road to the beach, killing Bloodsails along the way. Down the beach, you will find a few small camps of Bloodsails. Somewhere in or around one of those camps will be the Bloodsail Charts and the Bloodsail Orders. They move every time they're looted. Be especially careful pulling at the big camp at the very end of the sands. Be sure to check the rowboat as well.
You might consider hanging out here to finish those two sidequests as well. There is a follow-up to the current Buccaneers quest, but you might opt out of it. The guide does. Considering that, you'll only get one other chance to kill Bloodsails, and only because they're nearby something else.
One last optional quest. Get a couple friends and attempt to tackle the giant that's at the far north end of the beach for The Captain's Chest. If you can't find anyone to do the quest with, skip it. No great loss.
Scene 6 - By the Bundle, Even (level 43)
Quests completed: Akiris By the Bundle, Raptor Mastery 4
You might want to take a water breathing potion with you if you've got one.
Head through the Bloodsail cove that scene 2 started in. Go straight across the bridge and keep going until you start seeing nagas. The nagas in the area are pretty much all level 44, which shouldn't phase you by now since the Zanzil stuff was as well. Fight nagas along the beach and on the two upper slopes to get your akiris reeds.
When you are finished, go north to the Bloodsail Compound. If you have not finished Up to Snuff or Keep an Eye Out, hang out here for a little bit. At least finish Up To Snuff even if never find the elusive eyeball.
To the northeast of the Bloodsails is raptor territory. Head through there, searching for Tethis. He can be anywhere where the Jungle Stalkers spawn, so you may have to hunt for a bit. Once you find him, continue your trek northward.
Go around Grom'gol and travel up the Haunted Isle. Your final task for this scene is to dive to the Altar of the Tides, clear out the nearby murlocs, and use Catelyn's Dagger. This will summon Ghazban. Kill him and take the Stone of the Tides. (Ghazban does a decently long stun. Be wary if you have a breath meter.)
Hike back to the hunter camp to turn in Raptor Mastery and get your final challenge.
Scene 7 - Big Game Ogres (level 43)
Quests completed: Big Game Hunter, Mai'zoth, Cracking Maury's Foot
You will want a partner or two for these last quests. It's possible to solo them -- I did with my hunter -- but most classes won't be able to kill a 43 elite that summons adds or a rather sturdy ogres that comes with 2 friends.
The grand finale to the quests you began in the north. There is a small plateau across the road from the Ziata'jal Ruins. On top of this plateau is King Bangalash, the white tiger that is the prize jewel of the hunter's jungle. Search around him first for stealth panthers, and then attack him. At about 50%, he will summon two small panthers. They go down pretty easily, and you might want to kill them off if you're trying to solo him.
Then head northeast to the Mosh'ogg Ogre Mound. You have two affairs here. You need a key that is a random drop from any of the ogres, and you want to kill Mai'zoth, the ogre mage hiding in the back of the mound. Clear your way through these former elites to Mai'zoth. Watch the pull -- CC is good. Hang out til you get the key if you beat Mai'zoth first.
Return to the two camps to finish your quests, and then back to Booty Bay for Cracking Maury's Foot.
Skedaddle (level 44)
It's time to move on to the next set of zones. Pack up your things, get your quest items out of the bank, take the quest with the timer, and hop on a boat to Kalimdor. Go to Theramore first for Akiris By the Bundle and also maybe to talk to the First Aid trainer since he will teach you more advanced bandages as your skill advances.
After that, it's off to the races. Complete quests at the track, and return to Gadgetzan. You do not need to collect all the quests from Gadgetzan YET. The only quest you should get now is Handle With Care, although taking the others won't hurt since our log should be nearly empty now.
The zones we are using next are Tanaris, Feralas and Hinterlands, or TFH for short. The quests from these zones like to pass you around, jumping from one to another to another...and sometimes to Darnassus. You've just gotten a quest for Darnassus, and you will get two more from Feralas before being bounced to Tanaris, which makes Feralas the logical starting point for these next zones.
Fly to Thalanaar and go west. Stay south until you cross the first river. Then do what you can to work back up to the road and follow it all the way down to the shoreline. Along the waterfront, there will be a dock with a boat that circles around to take you to the Alliance outpost on the northern island. Or you can just swim there, which honestly is just as easy if the boat isn't right there waiting for you.
All told, there are 22 quests you *could* have from Tanaris and Feralas if you stopped to grab everything back in the desert. However, our focus for a level or two will be in Feralas, which means we're only worried with two particular quests. More on that in Act 11.
|
