Azuarc's Leveling Guide part 23
Azuarc's leveling guide for Alliance, Act 23: Netherstorm (68-70)
We're on to what will be the end of the pre-Lich King guide. Although we will continue with a guide that will take you most of the way to 70, with Lich King now released, it seems likely that most players will take off for Northrend before completing this act. Particularly when faster leveling courtesy of version 3.0 means you will probably be ahead of the levels written in the guide and conventional wisdom says you should go to the next expansion at two below the old cap, you might not even spend *any* time in Netherstorm.
However, I am advising you to persevere a bit.
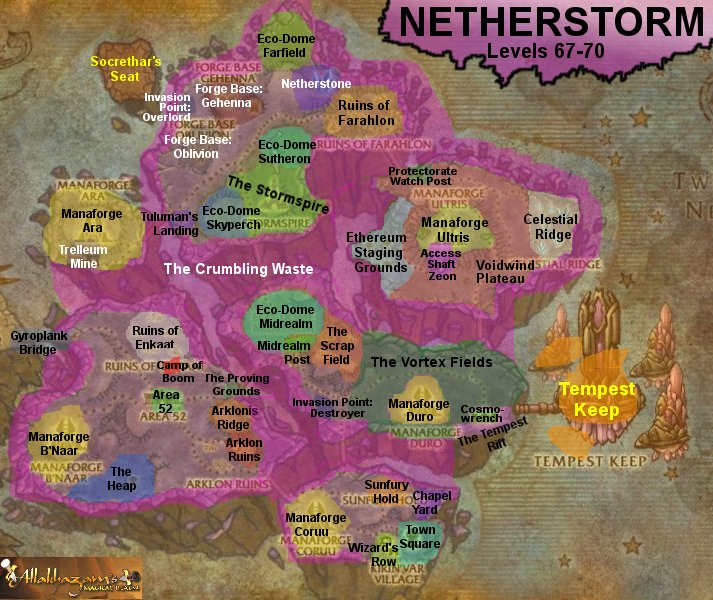
Look at that map carefully. You should be able to recognize that Netherstorm is split into 5 main islands. (6 if you count the one Manaforge Ara is on.) The curious thing about questing in Netherstorm is that it is completely segregated by island. There's no crossover AT ALL. So when I say we're going to do all the quests on Area 52's island first, I really mean it. Some of those quest lines eventually leave that island, but you can do all of that southwest island without really coming back.
The other quest hubs in the zone include Midrealm Post, "Town Square" in the ghost town Kirin'var Village, the tiny town of Cosmowrench (flight point), the Consortium headquarters at The Stormspire (flight point), Tuluman's Landing, and Protectorate Watch Post. Yes, we will gradually move to each of those areas. You're welcome to break away and do your own thing at any time, of course.
Preparing for Level 70
During Burning Crusade era, there were a few places that players went as they approached 70 to get some things in order first. One of those was Deadwind Pass to start the keying process for Karazhan. Another was the Caverns of Time, beginning with Old Hillsbrad Foothills so they could get access to The Black Morass -- which was needed for Karazhan keying.
The other item of consequence was getting enough reputation to get heroic keys for each of the major instance hubs. Fortunately you only need Honored reputation rather than Revered now. While the guide has moved away from working on reputation and instance running, it was originally encouraged for Outland zones while Burning Crusade was the focus. If you find yourself in a situation where level 70 is your cap, these may be things to start worrying about.
But even if you aren't stopping at 70 and are continuing on to Lich King's level 80, you'll still need to reach 70 first. So let's get started.
Your quest list:
- Breaking Down Netherock
- Securing the Shaleskin Shale
- The Archmage's Staff
- Wanted: Annihilator Servo!
- You're Hired!
- Consortium Crystal Collection
- Distraction at Manaforge B'naar (Aldor only)
- Manaforge B'naar (Scryer only)
Scene 1 - B'naar (level 68)
Quests completed: Securing the Shaleskin Shale, Aldor/Scryer manaforge quest #1 (see below)
Ride back up the road to the Gyro-plank Bridge, and start crossing the southern wastes where you can attack the Shaleskin Flayers. Collect the drops for Securing the Shaleskin Shale en route to Mana Forge B'naar.
Depending on your faction, Aldor or Scryer, you'll have different quests here, and throughout the Mana Forge quest series. So there's going to be a lot of double descriptions.
Aldor - Distraction at Manaforge B'naar just wants you to kill the basic mobs outside the forge. Bloodwarders are found throughout the area patrolling, and the magisters are in the actual camps.
Scryer - Captain Arathyn rides a hawkstrider on a small hill along the road before the actual Manaforge, and should be a fairly easy kill for Manaforge B'naar
Complete your appropraite quest and return to A52.
Scene 2 - Enkaat (level 68)
Quests completed: Mark V is Alive!, You're Hired!, Report to Engineering
Ride up the northern road again, and talk to Bot-Specialist Alley. After that, prepare yourself for an escort, and talk to the robot next to her. The quest is marked group, but with careful management, it should be acceptable. Just follow normal escort etiquette -- stay behind your ward, don't aggro anything they don't, and defend them when they get into trouble. As time permits, grab some of the little crystal things on the ground as well, but don't jeopardize the escort to do it. You can always go back into the ruins solo later. There are a couple spots that can get nasty, so if you fail the escort, don't worry about doing it a second time. It's really not that big a deal.
Return to Area 52 and get the follow-up quests after talking to Alley.
Scene 3 - Arklon (level 68)
Quests completed: The Archmage's Staff, Consortium Crystal Zapping, Invaluable Asset Zapping
Travel east to the Ruins of Arklon. If you see a nether ray along the way, stop and kill it. The ruins themselves are filled with demons, especially felhounds. Fight into the central area, and you should see a central altar, various odd goblin objects in different directions, and a named demon in the back. Clear your way around the altar and use the powder given to you by Ravandwyr to summon Ekkorash the Inquisitor. Kill her for the staff. Then set out to teleport the goblin belongings back to Area 52. One of them is back by Pentatharon, who you need to kill anyway. With Arklon Crystal Artifact in hand and the four assets zapped, return to Area 52.
Scene 4 - the Great North (level 68)
Quests completed: Rebuilding the Staff, That Little Extra Kick, Recharging the Batteries, Dr. Boom, Essence for the Engines, Curse of the Violet Tower
Wouldn't you know it, we get another quest for the Ruins of Enkaat. Go back up there and beat up on some random ghosts. The drop rate is good, so this should conclude quickly. From there, go a little bit to the east and attack the Mana Wraiths throughout the area. Their drop rate is *not* good, so this should not conclude quickly.
As you're moving east, you may stumble across an area called Camp of Boom. This is somewhere you need to be as well. Killing Dr. Boom is tricky, because you can't actually fight him. He'll nuke the heck out of you if you get too close, his walking bombs make it hard to get near him anyway, and he has a zillion HP if you try to shoot him to death. (Actually, about 600k if memory serves me.) The trick to killing Dr. Boom is the Boom's Doom grenades you have. Right click them, sneak between the bombs to get close enough to throw them at him -- no closer -- and then move back out until the cooldown finishes. Repeat 5 times.
The final task for this session is to get out to the northern edge of the island and fight the Phase Hunters and Nether Rays for their respective quests. Both drain mana and can be VERY annoying to casters, so you might choose to skip these quests. After fighting mana wraiths that sap mana as well, you might have had enough of those shenanigans. However, if you hang in there and kill the rays and worms, return to Alley outside of Enkaat before returning to town.
Scene 5 - Heapings (level 68)
Quests completed: Pick Your Part, A Heap of Ethereals, Pick Your Part, Breaking Down Netherock (maybe), High Value Targets (Scryer), Bloodgem Crystals (Scryer), Naaru Technology (Aldor), B'naar Console Transcription (Aldor), Measuring Warp Engines (Aldor), Wanted:Annihilator Servo (maybe)
Leave Area 52 south and a little west, heading towards The Heap. There are tons of ethereals here, so move slowly, as most of your battles will probably involve fighting two guys at once. You need to kill a bunch to collect 10 Zaxxis Insignias anyway, but your focus is on the little glowing balls in cubes. As you mostly finish the quest, and then continue southeast to the edge of the world where you will find some air and earth elementals. Zap them with your Elemental Power Extractor and then loot the small pink gem that hovers above their corpse afterwards. This should go by quickly. If you've got a friend, you can try taking down Netherock, the giant that patrols through the area.
Cross over the heap again, and finish the quests if you haven't already, en route to Mana Forge B'naar. You should have two Aldor or Scryer quests here to finish up the trip.
Aldor - There is a large pipe coming out of the Manaforge on all four sides. Get to the base of the pipe on each side and perform a reading. You will also need to get to the center of the forge to inspect the console. Recommended route: get the eastern pipe first, then go to the southern pipe, enter the mana forge and check the console, and then grab the west and the north.
Scryer - The high value targets you need are all around the manaforge, but not in the actual camps. Mostly by the pipes and in the rocky areas to the east of the forge. You'll also want to kill arcanists until you get a bloodgem.
Scene 6 - Extra Heapings (level 68)
Quests completed: Warp Raider Nesaad, Shutting Down Manaforge B'naar
On the southwest corner of the heap is a named ethereal flanked by two normal guys. You'll need to reach and kill Warp Raider Nesaad. As before, take your time in The Heap.
Afterwards, head inside Manaforge B'naar. Clear around the outer edge of the room to get to Overseer Theredis. Take his "keys" to the console, and then clear the rest of the room. Clearing the room is important. You will shut down four different mana forges, and the others will be downright impossible if you don't. With the room freshly cleared, activate the console. You will need to hold your position for two minutes while an occasional Sunfury Technician comes out to try to reactivate the Manaforge. They can come from any of the three hallways that leads outside, so make sure you're looking around for the possibility that one has come in recently. Once you engage them, they will stay focused on you rather than the console. In B'naar, this is almost trivial, as you get maybe 3 technicians total, but they will be more difficult at the other forges.
Scene 7 - Biodome With Shauly Pore (level 68)
Quests completed: Request for Assistance, Help Mama Wheeler, Keeping up Appearances, New Opportunities, In a Scrap With the Legion, One Demon's Trash...], [[WoW quest:Run a Diagnostic!
You are now officially done with the first island. We'll be looking at the two that connect to it next. We're gonna hit the north one first, and then the east, and then back to the north.
Take the northeast road out of Area 52, and across the bridge to Eco-Dome Midrealm. Stick to the road, and run right through the bubble when the road goes inside. At Midrealm Post, you'll find a number of new questgivers. Grab the new quests and start heading around the dome clockwise. You need to kill 10 cats (which should be easy) and pick up 15 Ivory Bells (which should still be easy, but be more challenging with all the lynxes in the way.) Ivory Bells seem most dense in the northwest corner of the dome.
When those two are finished, rotate around the outside of the dome until you reach The Scrap Field. Work carefully through the demons here, since the gan'arg seem to always come in pairs. They aren't hard-linked, but they tend to be bunched so that it always happens -- and they also run off in some direction after they toss their dynamite, so watch your surroundings. Focus on clearing to the various Fel Reaver Parts since that should finish after the kill count.
After the legion quests are finished, head inside the dome. At about the 4:00 position is a set of equipment where you can Run a Diagnostic! Grab and go back to the questgivers.
Scene 7b - Saboteurs (level 68/69)
Quests completed: Deal With the Saboteurs, Declawing Doomclaw, Drijya Needs Your Help, Warn Area 52!
Head north from Midrealm Post to the pool in the center of the dome. Kill a bunch of crocolisks, and then loop around the east of the dome to the legion like you did the last time. This time, go wide and avoid the demons. You're looking for a named Mo'arg named Doomclaw. Kill him, and travel south to the road. Hike back up toward Midrealm Post, and you should see Drijya. Complete the quest to talk to him, but don't actually take the follow-up escort unless you've brought some help. Instead, return to the post, and then to Area 52.
Scene 8a - The Big Finale (level 68/69)
Quests completed: Stealth Flight (Scryer), Behind Enemy Lines (Scryer), The Sigil of Krasus
This trip out of town is going to be so long it's broken into pieces. While it's recommended you do all of scene 8 in one pass, this will take a long time. Plus the quests completed list is long enough to give you seizures, so that had to be split up. (You will genuinely complete TWENTY quests before you return to town.)
If you are Scryer, take the flight out of town. For Aldor, just ride down the road to the east toward Manaforge Coruu. There are some quests for Manaforge Coruu, but there's only one thing we're going to do right now. Find Spellbinder Maryana on the northeast side of the forge. Kill her, (remember this place,) and step out to safety. Activate the archmage's staff and talk to Tervosh for the next leg of the series.
Ride down the road to the southeast past Sunfury Hold into Kirin'var Village and grab all the new quests here. This place is a questing smorgasborg.
Scene 8b - Kirin'var Village (level 69)
Quests completed: Cohlien Frostweaver, Conjurer Luminrath, Battle-mage Dathric, Abjurist Belmara, Krasus's Compendium, Malevolant Remains, Indispensable Tools, The Unending Invasion, A Fate Worse Than Death
You should be at the tower in Kirin'var Village where Archmage Tervosh is being held. Circle around it to the north and enter the town square. Take your time. You need plenty of kills, and there is plenty that can and will get in your way.
- Follow the path into town and look for Cohlien Frostweaver, a gnome mage. Lay him to rest and loot his cap to start a new quest.
- Push into the northeast section of town. (NOT across the bridge to the Chapel Yard.) You should encounter Conjurer Luminrath before you get very far. Same procedure as Cohlien.
- Enter the town hall and kill Battle-Mage Dathric. We will return to kill him again, but grab his sword for now.
- Follow the path to the southern end of town, and kill Abjurist Belmara.
- In the center of the lower end of town, fight into each of the houses until you find the three pieces of the compendium. Consult with Tervosh via staff once you have all three.
- Enter Wizard's Row to the west, and collect the Mana Bomb Fragment in the center of the area.
- Clear into each house. Wherever you see a noteworthy piece of furniture, right-click the mage possessions until one of them is able to be left there. There will be one for all four.
- Hang out long enough to finish the mobs for A Fate Worse Than Death.
If all goes well, the only part of this that should actually be difficult is the parts in Wizard's Row for mana-users. However, if you die, the area can be very unforgiving for someone trying to get set up again. Don't dawdle, but don't try to rush past stuff either. It's been a long time since we've read the guide's prologue, but the rules still apply at level 69.
Return to the central tower when you're complete.
Scene 8c - Sunfury Hold (level 69)
Quests completed: Unlocking the Compendium, The Sunfury Garrison, Torching Sunfury Hold
Skip up the road to Sunfury Hold. I recommend approaching it from around the right rear rather than going in the front door. You can hop the fence. Your goals here are three-fold. You need to kill archers. You need to kill flamekeepers and use their torches against the ballistae and tents in the camp. And you need to kill Spellreaver Marathelle. If not for the last part, you could hide in the upper ridges and just wait for the tents to stop burning so you can torch them again. However, you still don't need to clear the entire camp, and some sections of the camp are very deadly, so just stay behind the main tent and sneak around the far side of it to grab Marathelle. If all goes well, the archers should be the last quest you finish.
Scene 8d - Manaforge Coruu (level 69)
Quests completed: Potential Energy Source, Shutting Down Manaforge Coruu, Attack on Manaforge Coruu (Aldor), A Convincing Disguise (Scryer), Information Gathering (Scryer), Return to Thalodien (Scryer)
The quests for Aldor and Scryer are mostly equivalent, but at Coruu, the Scryer quests are way cooler. All the Aldor gets here is a basic kill quest.
Return to the camp on the northeast side of the forge where you fought Spellbinder Maryana. Clear the area to get to the glowing boxes.
Scryer only: Continue killing mobs until you have all the costume pieces, and take them to Caledis Brightdawn. Sneak into the manaforge and attend the meeting in the room where Commander Dawnforge and Arcanist Ardonis are speaking. Then go back to Caledis to get the final Manaforge quest.
Everyone: Fight into the manaforge and use the same exact procedure you used for the first manaforge to shut it down. Kill the guy with the controls, Overseer Seylanna, clear the rest of the room, and then activate the console and defend it for two minutes. A fresh clearing is important, especially if you killed Overseer Seylanna first, because she tends to respawn in the middle of the event.
Return to Kirin'var Village afterwards. (And Caledis first for Scryers.)
Scene 8e - More Fun in the Town Square (level 69)
Quests completed: Building a Perimeter, Master Smith Rhonsus, The Annals of Kirin'var
Go around the western edge of the village and look for a rune. Use your Rune Activation Device, and then return back to the tower and take the northern road back into the town square. You'll see another rune right in the middle of things. Fight to it, activate it, and then go into the town hall. Regrettably, Battle-Mage Dathric must die again.
Leave the town hall and turn right (north) toward the forge. Cautiously work back to it and kill Smith Rhonsus.
Cross the spooky bridge to the Chapel Yard and immediately turn left and run up the hill. The last rune should be at the top of it. Return to the tower to complete these quests.
Scene 8f - The Mystery of the Chapel Yard (level 69)
Quests completed: Needs More Cowbell, Searching For Evidence, A Lingering Suspicion, Capturing the Phylactery
We finally explore the Chapel Yard. Cross the bridge and stay around the left edge of town. There is a pasture in the northwest corner of the area where you can finish a quest with Bessie. Then work your way inside the barn and access the necromantic focus amidst the stables there. Now you have what amounts to a kill quest in the area. Kill whomever, whatever, wherever. Just don't go inside the chapel.
In particular, try to take notice of the outhouses behind the inn. You'll be returning to those momentarily. When you have your 10 essences, turn them in and come back to these port-o-potties. Niberius' phylactery is hidden in the center outhouse. Take it back to the tower.
You're welcome to try killing Niberius, but you'll need a group. Instead, how about just hearthing to Area 52 and taking a nap instead?
Halfway thru 69
Or not. Under the old experience gains before version 3.0, you would not quite be to 70 yet, and would need to quest around Manaforge Duro, and then do Stormspire quests to finish the trek to 70. Some day I may revise the Burning Crusade portion of the guide, but at this point, you're probably all set to move on to Northrend.
|
