News Editor Help
| Contents [hide] |
How to Post News on ZAM
- Go to the news submission page. To find the page, simply click on your name in the top right corner, then Admin CP. Then click on "News story admin" in the middle of the list.
- If there are any images that you’d like to include in your article, please uploaded them at this point. If you add them after you’ve written your story, you will lose everything upon uploading them. See the below section on adding images for more details.
- Fill in the appropriate fields. Remember that ZAM.com aggregates all of the news posted onto its front page, so please be as descriptive as possible. Let's go down the list of fields and what they mean:
- Title of Story: Simply put, this is the actual headline of your article. Please capitalize all major words.
- Subtitle: This is a full sentence that will be placed under the headline for more description. This field only needs to be used if the article is going in a featurebox, or if you feel the need to add more details.

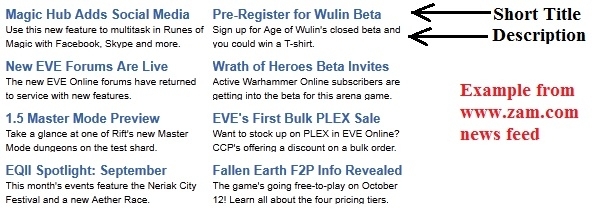
- Short Title: This short title will go in the news feed on ZAM.com (and rift.zam.com for Rift stories). Do not simply copy and paste the text in the "Title of Story" field because it most likely won't fit. Please capitalize all major words and be as descriptive as possible in what little space you have.
- Description: This will also appear in the news feed on ZAM.com. It gives you a little extra room to describe your story.
- Additional notes on Short Title and Description: A box will appear to the right of these fields to show you exactly what it will look like on ZAM.com. If any words are cut off in the box, they'll be cut off on ZAM.com. Also, be sure to put the name of your game in either the Short Title or Description, whichever fits better. The news feed on ZAM.com features a lot of games, and adding the game's name is the only way of knowing what the article is about. Avoid acronyms unless they're well known, such as WoW.

- Sort Time: Generally leave it blank. Moves the article up or down in the news feed after publication.
- Publish Time: Generally leave it blank. Sets the article to go live at a future date.
- When to change Sort Time and Publish Time: As mentioned, you should generally leave these blank. The are only two reasons to mess with these fields: To set a story to publish at a later time, or to move an already published story up or down in the news feed. To set a story to publish in the future, use the 24-hour date format listed on the page to set both fields to the same time (example: Entering "2011-12-25 11:00:00" in both fields will set the article to go live on Dec. 25, 2011 at 11 a.m. CST). To bump a story after it's published, change the "Sort Time" only.
- Category: Simply pick your game from the drop-down menu. If the game is not listed or it's a more general article, select "General News."
- Type: Select the type of article from the drop-down menu. It will generally be "News."
- Additional Tags: Generally left blank. Here's where you can add tags for other games so the article will appear on other sites, or tags you've generated to group articles (Examples: Adding the tag "PAXPrime2011" to a series of PAX articles groups them together, while adding the "TERA" tag will make the article appear on tera.zam.com). To add multiple tags in this field, simply leave a blank between each one (example: SonyOnlineEntertainment EverQuestII FreeRealms). Tags can easily be added to an article after it's been published by clicking the green "+" button in the bottom right by the tags.
- Feature Image ID: Generally left blank. Here's where you'd add the image ID number if the story is going in the featurebox on ZAM.com or one of our other sites. They're also used for the games in the tabbed news section on ZAM.com. Feature image should be sized at 536x402.
- Begin writing (or copying and pasting) your article in the Preview section. If you're making a small news post, the entire thing can usually be confined completely to the Preview section. If possible, always try to add an image to this field. Images should be 600 width.
- Put the rest of your article into the Story section (also known as "below the jump"). This is used for lengthy articles or to add items after the jump, such as patch notes.
- Please paginate your articles after approximately 500 words by clicking on the Add a Page link under the Story box. For every 500 words thereafter, please add another page. Keep in mind that this word limit is not set in stone, so use your best judgement when adding new pages.
How to Add Images to Your Article
The bottom of the news submission page has an image uploader and gallery. To use images in a news post, you should first upload the images, then create your story. Uploading images resets all the fields, so you'll lose your article if you don't upload the images first.
IMPORTANT: Please only upload images that you intend to use for the specific story you're planning to publish. This gallery is not intended for random images.
- Click on the Add Image button at the bottom of the page. If you plan to upload multiple images, continue to click the Add An Upload Box link to add up to 10 images at one time.
- All images posted in stories should be a maximum of 600 width. Use your best judgement for the height, although the height for images in the Preview field should be kept to a minimum. Think of images at the top of stories as horizontal banners. You can either change the size of your images using editing software before uploading, or simply use our resizing tool that appears after uploading images.
- Once all your images are uploaded, they'll appear at the bottom of the news submission page. To add an image to your article, click on it so you can get its six-digit ID number. Then click on the icon of the tree (under where it says Font Family) in either the Preview or Story section, depending where you're placing the image. Copy/paste the number into the "Image URL or ID" section and enter the number "6" into the Horizontal/Vertical fields just to provide some space around the image and hit the Insert button. You can mess around with the placement of the images to see what looks best.
- If you don't use all of the images that you uploaded, go back to the news submission page once your article is published and delete the unused images.
The Image Queue
The image queue on the news submission form gets pretty full after a while. Click here to purge all but the last 7 days of images.
How to Add Videos to Your Article
We have the ability to embed videos into our articles. You will generally do this either using ZAM videos or YouTube videos.
To add ZAM videos:
- First click on the Videos menu at the top of ZAM.com. Click on the Upload Videos link at the very bottom and then upload your video. Once it's been uploaded, click the My Videos link under the Videos tab. You should see that your video is either processing or failed. Processing can take quite a bit of time depending on the size and file type. Once it has appeared in your My Videos section, click on it to add a title. You can also click on Expand Video Info at the right to add a short description.
- To add your ZAM video to your story, click on Expand Video Info on the video's page and copy the embed code. Go to your story and click the HTML button (under Font Size). Paste the code into your story wherever you like. Videos can go above the jump to make sure our readers see them.
To add YouTube videos:
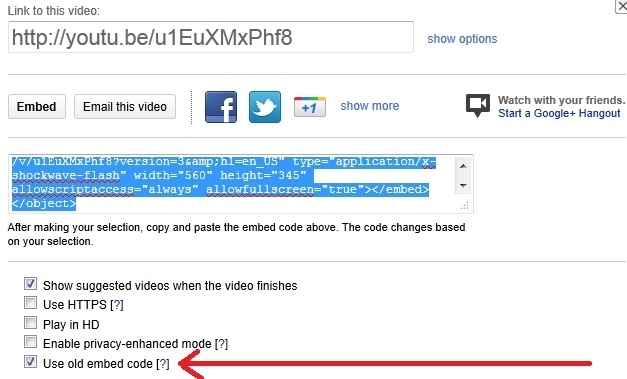
- Go to the video's YouTube page and click the Share button under it, then click the Embed button. Make sure the Use Old Embed Code box is checked and that you've picked one of the width options that is under 600 (560x345 is usually what you'll pick). Once you've done all that, simply copy the HTML code and paste it into the HTML of your story.
- Once you've checked that Use Old Embed Code box on YouTube, it should save your settings. If you're getting a very short code to copy/paste, then you don't have it checked. We can currently only use the old, lengthy HTML code.

This page last modified 2012-09-26 10:44:44.
© 2024 Fanbyte LLC