Photography Master Guide (Rift)
What We All Strive For In A Screenshot
| Contents [hide] |
Step 1: Software
You're going to need something that allows you to either open a saved screenshot, crop it, and save it as a .jpg; or something that allows you to take cropped screenshots. The latter saves several steps.
A recommended, easy to use, free, small, and lightweight program that will work is IrFanView.
You'll see how easy it makes it as you read on.
Other programs will work, but will require additional steps than those given.
Step 2: Preparing The Image
- Setting Up
- First, to make IrFanView play nice with the game, you'll need to make sure the game is running in Windowed mode. You can do this in game by opening the Main Menu (ESC), selecting Settings->Video, and setting Window Mode to either Windowed or Fullscreen Windowed, then hit OK which will apply the settings.
- The other thing that you may wish to do, especially if taking large picture, is pressing CTRL-U (by default) to hide the User Interface. Pressing it again will also hide nameplates. Pressing it a third time restores the interface.
- The last thing you do, is open IrFanView. You should see the IrFanView window in front, and the game window behind.
- Taking the Screenshot
- With the IrFanView window selected, press CTRL-Print Screen. The IrFanView window should become hidden, and you should see two lines across the screen, with the mouse in the center. Move the mouse to the top left of where you want to capture and click the left mouse button. Next, move the mouse to the lower right of where you want to capture, and click the left mouse button again. IrFanView should reappear with the selected area saved, and already cropped.
- Saving The File
- Next, we need to save the file so we can upload it. In IrFanView, select File>Save As (or simply press S). Navigate to a folder you'll be saving images in (it will remember where next time), and give the file a name you can remember. Next, select Save as type, then select JPG - JPG/JPEG Format. Next, go ahead and make sure the slider on the right is set to 70. Its more than enough quality for screenshots, and reduces the file size a little bit. Then click Save.
Once you've done this once, you'll see as easy as pressing buttons and clicking three times, and typing in a name.
Unbelievable? The steps, once you understand the process.
- Press ALT-Tab (to switch to IrFanView)
- Press CTRL-PrintScreen
- Click a corner
- Click a corner
- Press S (to save, and it remembers the location and options)
- Type in a file name
- Click Save.
Step 3: Uploading An Image
- Go to the desired page for the image/s
- Click the link "Media" in the toolbar at the top of the wiki page or in the drop down menu in the "Edit this page" drop down menu.
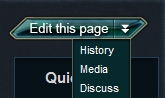 Wikibase Editing Menu | 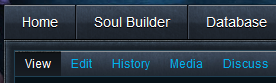 Wiki Toolbar |
- Click "Add Image" and a upload box will pop up.
- Choose which files you wish to upload, you can upload up to 10 images at once.
- The next page is the built-in image editor, here you can shrink images, and crop them. The page has some instructions on how to use it.
- If you don't have any last moment editing to do you can click "Commit Upload"
Step 4: Using An Image
- Click the image thumbnail you wish to use in the article.
- you will see a text box with something like this in it, [[Image:188138]]. This code is the wikicode you need to add the image to an article.
- Copy and paste the code into the desired article, the image will appear after saving the article.
|

Categories: RIFT | Guides (RIFT)
This page last modified 2013-02-03 19:23:46.
© 2024 Fanbyte LLC